Showing posts with label From the Stash. Show all posts

Tuesday, 8 November 2011

McCalls M5913

Due to the lack of sewing around here sewing lately, I thought I would share something I made last year, which kept me beautifully warm during the very cold winter we had.

McCalls 5913
I think it's the first time I've ever been "fashion forward", no one really passed comment on it last year, but this year everyone wants to know where I bought it. (Honestly, when will people get it - I SEW!)

I made the red one pictured above, with the belt holes and belt.  I got the fabric from Fabulous Fabrics in Ashby de la Zouch around 18 months ago, including the lining, which is a Paul Smith cotton.  To make it really warm and cosy I added a flannel interlining.


The pattern isn't lined, but I didn't like the thought of that so cut lining and interlining to the same pattern pieces and omitted the facings.  I put the interlining to the main fabric and treated as one.  As that made the fabric heavy and quite thick, I didn't want to worry about turn of cloth so so rather than sew everything together and turn through (like bagging the lining) I hemmed the bottom with self made bias binding.


I love this pattern so much I made view A for my sister 2 Christmases ago, and because she loves it so much made her another longer one last Christmas - no she won't be getting another one this year!


This is one pattern that I will be keeping - I  L O V E  capes and have just bought another pattern from the 1970's on Etsy - watch this space (but don't hold your breath because I have SO much I want to do first...)

Monday, 6 June 2011

Simplicity 2424 - another go at knit!

I can't let it beat me, I just can't!  So here we go again...  This time with a double knit, which I find easier to work with. 


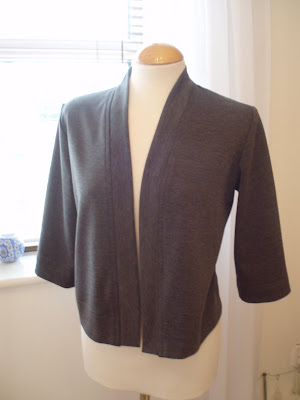
I made the red cardigan


Before Betty came to the rescue, I used Jennifer to make this, and boy did we struggle.  She really does not like knit.  Skipped stitches, blah, blah, blah.  Thank goodness this was a simple cardigan to make so we got through it in the end!

I cut a size 14, made a small sway back adjustment and added my usual 1" to the sleeve upper arm.  I didn't worry about doing any other alterations - it's a cardigan for goodness sake!  I did use some stay tape at the shoulder, but other than that it's just front, back, band and sleeves. 


It was super easy to make and looks great with Butterick 5147!

Watch this space - there's more to come.  I set myself a goal yesterday, and have almost succeeded!

Happy Monday everyone!

Friday, 3 June 2011

Spa Slippers, the easiest things in the world to sew


Well, I've been wearing mine for a couple of days and they are SO comfortable.  Great for summer, but not so sure they would keep your feet cosy and toasty in the winter months.....

The hardest thing about making them is finding the gripper stop for the soles.  I managed to find some on ebay earlier this year so bought a full meter - I like making and giving slippers!

You will need:
Outer fabric.  I used Clarke and Clarke 100% curtain weight cotton (ie washable!)
Inner fabric.  Fleece
Sole fabric.  Jiffy Grip.  Please don't try to use anything else.  You'll end up slipping and could seriously hurt yourself
Bias binding.  2cm wide and a full board.  Or if you are making it yourself, approx 2.5meters
Matching Thread
Any decoration you want to add - bows, bling, flowers etc, etc.

I used an old 1960s lingerie book for my pattern, but basically you draw around your foot for the sole and use a shaped rectangle for the top. Don't forget to add 1cm seam allowance

Cut out rectangles of your fabric as follows:  one left foot and one right foot (doh!) from sole fabric, outer fabric and inner fabric. 
Cut out slipper tops from outer fabric twice for each foot and fleece once for each foot.

Layer each piece and you will end up with something like this:


Next you stitch all the layers together within your 1cm seam allowance.  If you have a walking foot use it as the layers can shift - look they did on my top piece.  You can see it is only small (top right) and will be hidden later.


Next you need to add bias binding to the upper and lower edges of the top pieces

Had to include a picture of Betty as she has been such a trooper for these last two projects!

Adding the bias binding

Once the binding pieces are added, turn to the wrong side and stitch in the ditch to secure.

Stitch in the ditch

Once you have done that, pin the upper pieces to the soles.  I don't tack them in place but you can if you want to ensure they don't move once you get to the next step.

The final stage (yes we are there already!) is to pin bias binding around the outer edge.  It's a good idea to start and finish the binding on the inside edge and I fold over a little bit for extra neatness.

Stitch it in place and fold over to the bottom.  You may need to trim back your seam allowances at this stage as you have 6 layers of fabric at the sides.  You can either stitch in the ditch, or hand sew the binding to the bottom edge.  I like to hand sew mine - horses for courses.....


And you're done.  Just add any embellishment.  Easy Peasy Lemon Squeezy! 


Butterick 5497

Also entitled:  "My eyes, my eyes".....  Please someone remind me that small stripes make your eyes go funny.

A super easy knit top.  Easy to make and easy to wear.  I made the long sleeved version.  I cut a size 12, shortened the sleeves by 1" and shortened the length by 1.5".  I also had to grade out the hip area to a 14 at the hem.

Do you remember I have already commented "I don't do knits", well I was determined to crack it and after lots of trial and error with needles, tension, overlocker differential feed etc, I think I finally have - yey!

It's not me, it's Jennifer.  She really does not like knit fabrics.  But Betty has come to the rescue, good old Betty.  Oh, perhaps I should point out that Jennifer is my Janome 1660P and Betty is my lovely old Bernina 730.  I don't have two ladies hidden away doing all the sewing for me!

Trust me, Jennifer and I tried everything we could think of, ballpoint needles, blue tipped ballpoint needles, stretch needle, normal needles all to no avail. Ollie (the overlocker) tried and he did much better than I expected.  Bearing in mind Ollie only has 1 needle (shamefully the same one since I have purchased him over 20 years ago) and squeeks when helping me, He was a winner with this project.  BUT  you can't use the overlocker too much on this one because of the casings for the elastic at the arm and underbust points.

Anyhoo, Betty saved the day.  Here it is modeled on Vivienne for now.  I'll be wearing it over the next week so you will see it in the MMJ page shortly.

It looks much better on a real body!

Elasticated shoulders
Enjoy the rest of your day and hope the weather is as good for you as it is for us today. Bye from a sunny, warm Wiltshire....

It's a dogs' life!

Sunday, 29 May 2011

New Look 6407

View A/B toile.

It's been years since I made a proper shirt/blouse for myself.  I did intend to join Peter with his shirt sew-along but the tutu got in the way. So here it is, albeit a toile, and very late!

Lovely fit.  Note I have the cuff on the wrong way around -
that's what a toile's all about!


Not hemmed.  Sitting nicely around the neck.

Sorry, a blurry back.  I was trying to show you
how well it sits at the waist and back - it doesn't wrinkle
 like that, honestly
I used a piece of curtain lining as my calico is too heavy to make shirts.  I made it up as though making in my fabric with the exception of one arm* and I didn't use French seams.  It's pressed, clipped, finished and trimmed as it should be.  And I needed to practice my buttonholes so played about with those too.  The best result was achieved by using embroidery thread.

Yellow is the embroidery thread and gave the
best results on this piece
 So here are my notes made along the way.

 I cut a size 14 as advised in the Fast Fit Book.  Sandra ( I feel I can call her by her first name as I have spent so much time reading this book over the last few days!) says go with your full bust measurement when using New Look.  But in view of the neck issue I had with the grey linen top, I decided to have a go at adjusting the upper chest and back using her techniques.  I took out 2cm from the back, and graded out around 1.5cms at the hip and for the front I took out 1.5cms.

Here is the front adjustment, above the armhole

And the back, using the same technique
 I always have to add width at the sleeve for my bingo wings larger arms and shorten every sleeve I ever use!
BUT to add to the complication, the adjustment to the upper front lengthens the armhole so you have to add extra width to the front sleeve side seam too.  Now there is a possibility that the sleeve may twist once set in place, however I could not for the life of me work out what Sandra was asking me to do.  So I did nothing, I think it's worked out okay, but perhaps once made up for real I may be telling you a different tale!

How many alterations can you make to one sleeve piece? 
Answers on a postcard please!

Oh! I took out approx 1.5cms at the waist for my sway back.  I did do the hem, again for practice, after I had taken the photographs and referred back to Peters post re shirt hemming as David Coffin's book suggests using a rolled hem foot - and quite frankly that scared me! Peter suggests turning up a double, narrow hem.

*  I did add the other sleeve to double, double check the fit/twist - all okay.  Phew!


So there you have it.  I like the shape, I like the fit and I like the end result.  Making the adjustments wasn't hugely difficult and I enjoyed making the toile.  This shirt won't take very long to make up next time either. I have some shirting in the stash and will make a start on that later today.  I'm going to use soft linen for collar and cuff interfacing as I want this to be a "formal" looking shirt.

More later.  Happy Sunday everyone.

Monday, 23 May 2011

A Question of size.... Butterick 5147

Wednesday 25th May - Quick Update. 

I wore the linen top all day yesterday (with a little grey cardi that I made to go with, more on that later) and guess what?  THE most strange thing, it didn't crease or wrinkle - at all?!?!  Do you suppose that's something to do with the muslin linterlining?  The outer fabric is most definitely 100% linen, I just tested a remnant in my hand and it did stay creased.....

And more good news re this top - It fits b-e-a-u-t-i-f-u-l-l-y, the neck pleats worked out well. So much so, I will be making it again, in the same size, with the neck pleats.....  Don't you love it when a plan comes together?

Okay, Mrs Smug is off for a cup of tea and next project planning.

Happy Wednesday all.

Finished!
Also entitled "Blimey, the more books you read, the more confusing it gets!"


I like the Palmer and Pletsch series of fitting books, but have just read Fast Fit, properly, for the first time...  I think I prefer this book.  I found it easier to follow and laid out extremely well.

Cards on the table, I have a method that works everytime for a full bust adjustment, swayback, full tummy, full bottom, lengthening and shortening patterns and grading to a larger/smaller sizes.  I use these tried and tested methods for customer toiles and in class.  BUT  why can't I get it just right for me?  Am I being overly fussy?  

Here's an example where I though I would bite the bullet and cut a size 14 top.
 
The pattern used is Butterick 5147.  So looking at the envelope measurements (and finished garment measurements) a size 14 should fit me perfectly at the bust point, waist and hip (ahem, adding just a little extra at these two points...)  Yes, yes I know you are supposed to use your chest measurement as the bust measurement, but bear with me....

I decided not to line the linen I used as per pattern, but to interline it with muslin (washed 3 times to avoid any shrinkage) and finish neck and arms with a bound edge.

I tissue fit it, having pinned all the darts and seams very carefully, and guess what?  By jingo it fit!!!  I checked all my usual fitting "issue" areas and it was almost spot on.   I always need to do quite a large sway back adjustment and take out a fare old amount down the back seam from the neck to the waist.


So I got stuck in as quickly as possible, pieces cut and tailor tacked, I placed all 3 pieces on the ironed muslin, hand tacked in place and then cut the muslin.  It's going well isn't it?

I stitched it all together and used a concealed zip down the left hand side.  I hand stitched the hem in place - lovely, stitches hidden in the muslin, just perfect. 

Next I marked 1.5cm seam allowance around the neck and arm edges, folded my bias strips in half, pinned in place, stitched, trimmed, pressed open, pressed flat, pinned again and machine stitched one last time, it's all going brilliantly and such a quick project!  Do you think I should try it on?  Okay, I'll have a quick look before I go to bed. (I should mention I started this project yesterday evening.  I am not in the habit of going to bed during the working day!)

Mmmmm, as suspected, the upper chest area is too big.  I suppose I might get away with it.  But all that effort, I think I should do something with it.  I know, I'll put a couple of pleats in the neck before I bind it.

What do you think?  Have I got away with it?!

Neck pleats.  Approx 1" each.


Typical back adjustment for me.  Remember the New Look
white satin dress?

Interlined with muslin, side seams overlocked and neck/arm
edges bound with bias binding.  I'm sewing from the stash so the neck edge
is bound with ivory binding - well, who's going to see it?


Moral to this (long-winded) tale?  Stick with what you know best, don't try and re-invent the wheel!  Next time I will make a size 12 and go with my usual adjustments!  BUT  this has been a good learning curve.  If I need a pattern that crosses sizes I may go with the larger size and do an upper chest adjustment, that way the bottom half will fit with less grading out for my ample thighs....

Happy Monday everyone!

Monday, 16 May 2011

McCalls M2600

Also entitled:  "I don't do knit"


What can I say?  I did NOT enjoy the sewing process on this pattern.  Nothing wrong with the pattern at all, a lovely simple dress, no great shaping just a little gathering at the neckline and wonderfully quick and easy to make up.

I cut a 10 and garded to a 14 at the hip "just in case".  I could have left the side seams as a 12 as there is plenty of room in this tent dress.  IF I make it again I will add a couple of inches to the hem too.

I used a ballpoint needle and stretch stitch on my machine.  Yes, the overlocker still has black thread in it - how lazy am I?!  

Everything came from my stash, the fabric being a recent purchase from Ann at Gorgeous Fabrics.

Here it is during construction.  Neck and sleeve bands are not finished and I won't be wearing it with a black belt - I need to purchase a cream one:


Note to self:  MUST wear correct bra as it's a bit "hello boys" with the gathering at the neckline


enough room for two in that skirt!
 And here are the shoes I purchased to go with, including new nail varnish on my troll feet:


To be honest I don't think I will make this dress again.  The gathering around the neckline doesn't suit my bust at all and makes it look even bigger.  I'm having a love/hate relationship with this dress.  I didn't enjoy sewing the fabric and it's a bit short; however it is so light and comfortable... perhaps it will get shortened to a tunic or top at a later stage?

Oh, want to know Ian's reaction to the "in progress" dress?  "Very nice darling.  You need some false tan" No Ian, I need a holiday, ha, ha!!

Because I had purchased the shoes I wanted to be able to wear them with other things and had just purchased this fabric (honestly, before "shopping from the stash" was announced!)

another stetch - I need the practice!


Coral stretch Demin.  I may make another Susan Skirt

On another note.  I'm sorry if you have left a comment recently and now can't see it.  As most of you know Blogger was down for around 24 hours and since it's back  I have noticed comments have been removed (not by me, and not because of any dodgy content!).

Have a good week all!

Monday, 9 May 2011

Stash Shopping

Did I  mention I'm making my current and next few projects from my stash? 

Hello,  My name is Ruth and I am a hoarder. 

I keep anything related to sewing - duplicate books and patterns (some of which I am now giving away) and way, way too much fabric.  I honestly feel overwhelmed with the amount of fabric I have.


An old Polaroid photo of me aged 11 or 12 in a pink blouse I made.  Mum helped me with the
button loops, but I managed everything else myself.
 Well, to be honest I have been sewing "seriously" since I was 11.  At that age Mum bought me my fabric and I made everything up before we went shopping for any further supplies.  As soon as I started to earn my own money that was it - Records, lipstick and fabric were my preferred purchases.  Well sadly most of the records have gone, and the lipsticks got used or chucked out long ago, but the fabric?  Ah, the fabric - some of it's still there.

The lovely crepe I bought to make a dress for my friends wedding (now married 7 years with 2 children), the Christmas Ball satin bought 10 years ago, the Harris Tweed from last year, it's all there.  Currently hidden in the loft.  Out of sight and out of mind.

So now I work part-time and have to watch the pennies I went hunting for the red linen I knew I had stashed for this skirt (I only purchased it last summer) - and there it all was, crying out to me - "use me, use me".

I must still make outfits or pieces that very definitely mix and match, but have set the challenge to use only from the stash for the next couple of months (at least!).  I have allowed myself to purchase notations if I can't make do with what I already have.  Typically I guess it will be coloured thread and zips and the occasional length of lining.  Oh, and I've included patterns in that no purchase rule too.

In the 70's my Mum had a pattern stash that consisted of 1 A-line skirt, 1 shirt, 1 pencil skirt, 1 dress and 1 pair of trousers.  Fabric was purchased when it was needed and the button box was full of butttons taken from RTW garments that were past their best.  When did I get possessed with purchasing so much fabric?  Okay, some of it's been collected over a period of 15+ years, but honestly, why so much??

So this is my last purchase of fabric for some time.   I had to buy something from Liberty when visiting London...

Cotton Lawn - LOVE the print
No more fabric or pattern purchases allowed until the stash starts to deplete.  Watch this space.  There could be some "interesting" garments on the way.  Wish me luck!

Sunday, 8 May 2011

Vogue 7910

Also entitled - Oh Vogue 7910 let me count the ways I love thee....

Okay, I don't often gush about patterns, but this one is very, very good.  I made view C from an embroidered red linen from the stash.


View C is a-line, has pockets (I don't usually do pockets in skirts/trousers), a faced waistband, is unlined and has a lot of topstitching.  Following the sizing on the pattern envelope I cut a size 16.  I did read the pattern instructions but didn't need to follow them, with the exception of the pockets because I wasn't sure if they were attached to the seams, or left free (they are attached).

The only alteration I made was to pipe the top of the pockets and use an alternative fabric for the pocket insides and waist facing.  I also used bias binding to finish the facing and hem.  Stupidly I didn't tissue fit, or make a toile which didn't dawn on me until I had cut out all the pieces - so no 1" side seams for me on this one!  Fortunately I didn't need to worry, this pattern fit me right out of the packet with a minor tweek to the waist at the side seams, I had to take in about an inch on each side.

The other thing to mention about this pattern is the speed of which it comes together, honestly, even with all my additional understitching, zig zaging  and topstitching it took me around 5 hours from start to finish.  I'm also happy with my lapped zip.  I haven't done one for years and this one worked out beautifully, I used my own method for the insertion which I'll share with you another day.  I still have black thread in the overlocker so finished the seams with zig zag and pinking sheers.  Only problem was one spool of thread wasn't enough!

So what with Vogue 1170 and this one I've realised that a size 16 is a perfect fit for my bottom half - so long as it isn't a straight skirt pattern, I still have to tweek those around my thunder thighs....

Anyway, here it is.  On a hanger for now beacuse I'm in the middle of cooking Sunday lunch!


Working out the piping, and pocket lining


Looking good lapped zip! 
Although it does look a bit wonky on the hanger, it is all nice and straight once on

Pocket lining, piping and waist facing in rose print cotton
 I made it to go with this top, which is a short sleeve version of New Look 6892, and which I made last Thursday evening.

Another VERY dodgy self portrait!!

Enjoy the rest of your Sunday - we're just about to tuck into roast chicken....