Showing posts with label Butterick. Show all posts

Friday, 3 June 2011

Butterick 5497

Also entitled:  "My eyes, my eyes".....  Please someone remind me that small stripes make your eyes go funny.

A super easy knit top.  Easy to make and easy to wear.  I made the long sleeved version.  I cut a size 12, shortened the sleeves by 1" and shortened the length by 1.5".  I also had to grade out the hip area to a 14 at the hem.

Do you remember I have already commented "I don't do knits", well I was determined to crack it and after lots of trial and error with needles, tension, overlocker differential feed etc, I think I finally have - yey!

It's not me, it's Jennifer.  She really does not like knit fabrics.  But Betty has come to the rescue, good old Betty.  Oh, perhaps I should point out that Jennifer is my Janome 1660P and Betty is my lovely old Bernina 730.  I don't have two ladies hidden away doing all the sewing for me!

Trust me, Jennifer and I tried everything we could think of, ballpoint needles, blue tipped ballpoint needles, stretch needle, normal needles all to no avail. Ollie (the overlocker) tried and he did much better than I expected.  Bearing in mind Ollie only has 1 needle (shamefully the same one since I have purchased him over 20 years ago) and squeeks when helping me, He was a winner with this project.  BUT  you can't use the overlocker too much on this one because of the casings for the elastic at the arm and underbust points.

Anyhoo, Betty saved the day.  Here it is modeled on Vivienne for now.  I'll be wearing it over the next week so you will see it in the MMJ page shortly.

It looks much better on a real body!

Elasticated shoulders
Enjoy the rest of your day and hope the weather is as good for you as it is for us today. Bye from a sunny, warm Wiltshire....

It's a dogs' life!

Monday, 23 May 2011

A Question of size.... Butterick 5147

Wednesday 25th May - Quick Update. 

I wore the linen top all day yesterday (with a little grey cardi that I made to go with, more on that later) and guess what?  THE most strange thing, it didn't crease or wrinkle - at all?!?!  Do you suppose that's something to do with the muslin linterlining?  The outer fabric is most definitely 100% linen, I just tested a remnant in my hand and it did stay creased.....

And more good news re this top - It fits b-e-a-u-t-i-f-u-l-l-y, the neck pleats worked out well. So much so, I will be making it again, in the same size, with the neck pleats.....  Don't you love it when a plan comes together?

Okay, Mrs Smug is off for a cup of tea and next project planning.

Happy Wednesday all.
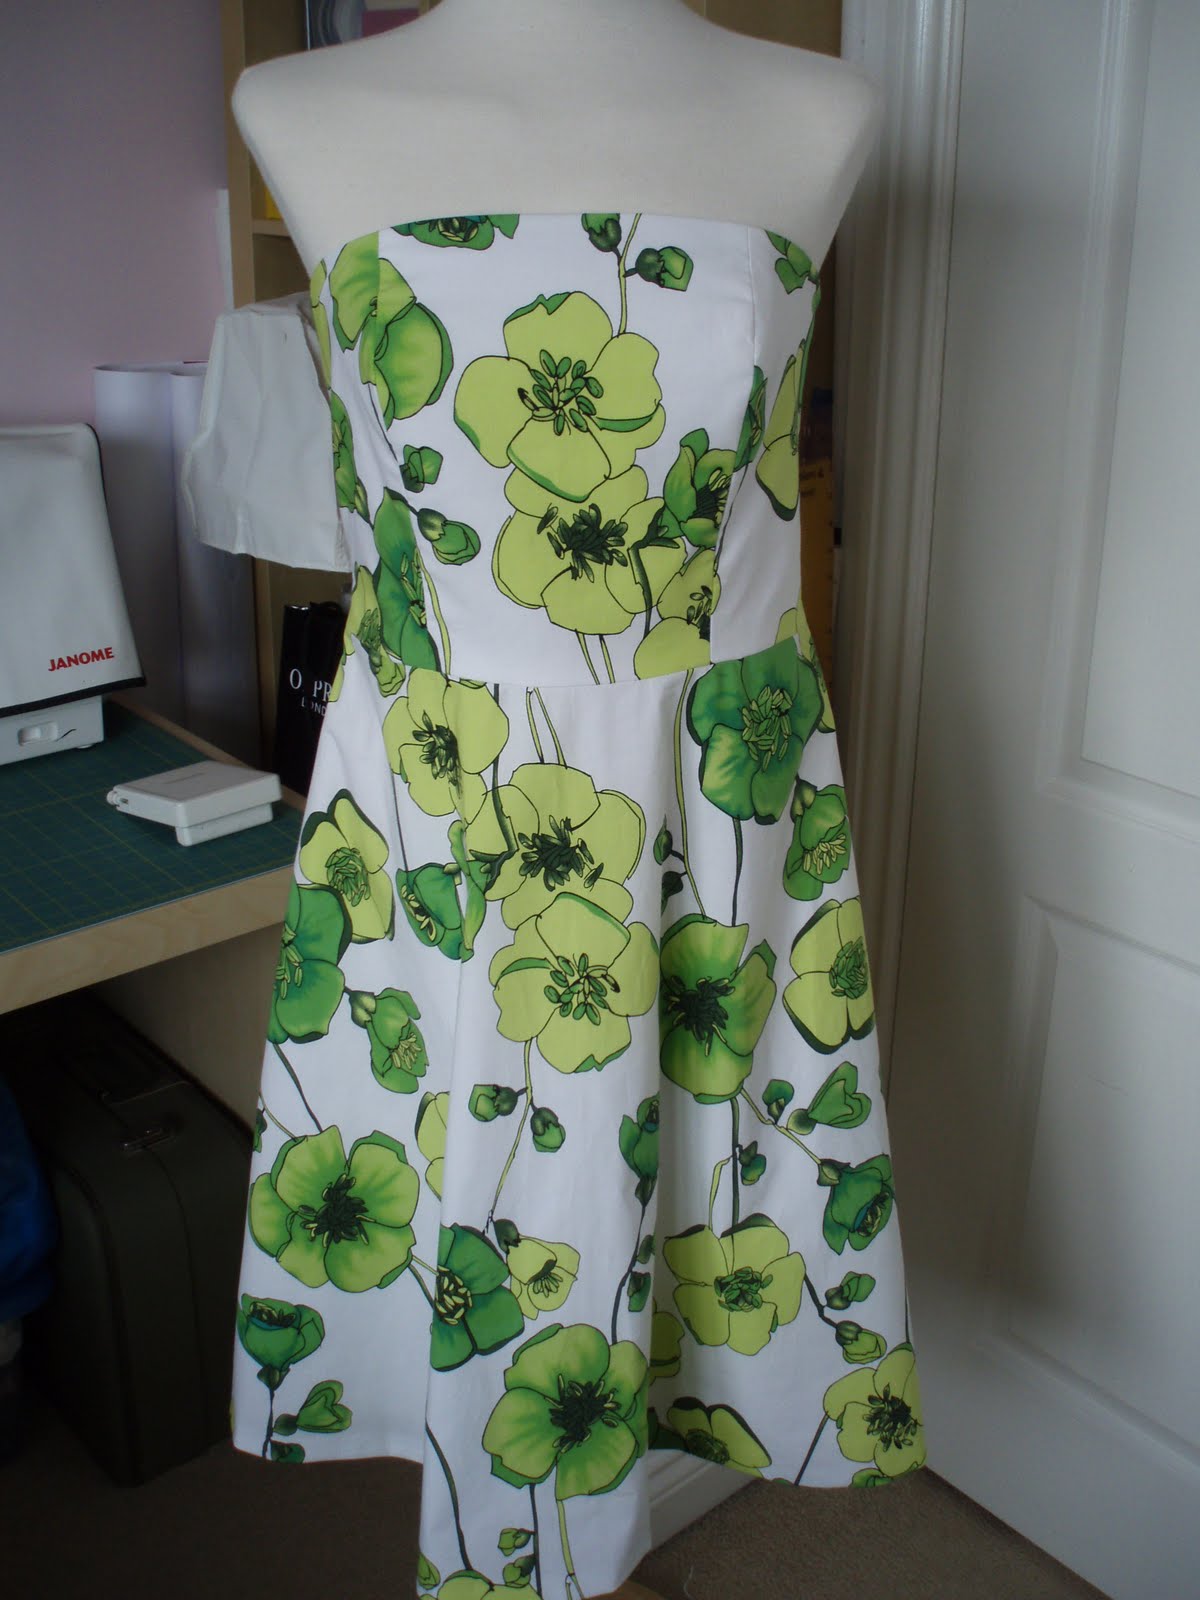
Finished!
Also entitled "Blimey, the more books you read, the more confusing it gets!"


I like the Palmer and Pletsch series of fitting books, but have just read Fast Fit, properly, for the first time...  I think I prefer this book.  I found it easier to follow and laid out extremely well.

Cards on the table, I have a method that works everytime for a full bust adjustment, swayback, full tummy, full bottom, lengthening and shortening patterns and grading to a larger/smaller sizes.  I use these tried and tested methods for customer toiles and in class.  BUT  why can't I get it just right for me?  Am I being overly fussy?  

Here's an example where I though I would bite the bullet and cut a size 14 top.
 
The pattern used is Butterick 5147.  So looking at the envelope measurements (and finished garment measurements) a size 14 should fit me perfectly at the bust point, waist and hip (ahem, adding just a little extra at these two points...)  Yes, yes I know you are supposed to use your chest measurement as the bust measurement, but bear with me....

I decided not to line the linen I used as per pattern, but to interline it with muslin (washed 3 times to avoid any shrinkage) and finish neck and arms with a bound edge.

I tissue fit it, having pinned all the darts and seams very carefully, and guess what?  By jingo it fit!!!  I checked all my usual fitting "issue" areas and it was almost spot on.   I always need to do quite a large sway back adjustment and take out a fare old amount down the back seam from the neck to the waist.


So I got stuck in as quickly as possible, pieces cut and tailor tacked, I placed all 3 pieces on the ironed muslin, hand tacked in place and then cut the muslin.  It's going well isn't it?

I stitched it all together and used a concealed zip down the left hand side.  I hand stitched the hem in place - lovely, stitches hidden in the muslin, just perfect. 

Next I marked 1.5cm seam allowance around the neck and arm edges, folded my bias strips in half, pinned in place, stitched, trimmed, pressed open, pressed flat, pinned again and machine stitched one last time, it's all going brilliantly and such a quick project!  Do you think I should try it on?  Okay, I'll have a quick look before I go to bed. (I should mention I started this project yesterday evening.  I am not in the habit of going to bed during the working day!)

Mmmmm, as suspected, the upper chest area is too big.  I suppose I might get away with it.  But all that effort, I think I should do something with it.  I know, I'll put a couple of pleats in the neck before I bind it.

What do you think?  Have I got away with it?!

Neck pleats.  Approx 1" each.


Typical back adjustment for me.  Remember the New Look
white satin dress?

Interlined with muslin, side seams overlocked and neck/arm
edges bound with bias binding.  I'm sewing from the stash so the neck edge
is bound with ivory binding - well, who's going to see it?


Moral to this (long-winded) tale?  Stick with what you know best, don't try and re-invent the wheel!  Next time I will make a size 12 and go with my usual adjustments!  BUT  this has been a good learning curve.  If I need a pattern that crosses sizes I may go with the larger size and do an upper chest adjustment, that way the bottom half will fit with less grading out for my ample thighs....

Happy Monday everyone!

Sunday, 1 May 2011

Butterick 4443. Part 4 and Done!

Phew, this dress is finished.  It took longer than anticipated due to Easter, London, Wedding, BBQs and life in general!
Okay, so where did we get to?  Oh yes, the corselette was finished and so was the dress and the lining.  The three sections just needed to come together.

Here's the dress and lining together, wrong sides together and pinned at the top edge.
Spot the mistake?  Yup, I put the netting on the wrong side of the lining.  It's very soft net so I'm going to leave it as is.  If it causes me a problem I'll re do it at a later date.

 For the hem, I used the 2" strip I removed from the lining at the hem and stitched it to the skirt.  It's a light hankerchief lawn and perfect for a faced hem.  As you can see I finished and pinked the edge as I had black thread in the overlocker and couldn't face re-threading it.....

Corselette now pinned to the top edge

Just another view.  On the Ironing Board waiting for the next step.
The next step is to finish the top edge with a bias strip.  I cut mine 2.5cms longer than the measurement of the dress top edge and 10cms deep.

Just in case you didn't know what a bias piece looks like!!
 I then sew the corselette to the dress, using 1.3cm seam allowance and a small zigzag stitch, stretching the powernet slightly to fit.  Then I stitch the bias strip, and again I use a small zigzag stitch.  I then TRIM as much of the seam allowances as I can as there are a fair few layers at this stage!  Once that's done, give it a good press and then understitch.  Press again and you're done!  Just trim the ends of the bias so they come just past the dress closure and I prick stitch them down

Here's a view looking from the top, down into the dress.


And here it is on Vivienne, the corselette is done up (as far as I can on the stand)
and zip left open so you can see the insides.
 There's no picture of me wearing this dress at the moment, Ian's busy building a wall at the front of the house so I didn't want to disturb him whilst he's in the swing of things!  As soon as I get change I'll get some photos taken, in the meantime here it is on Vivienne. 


I will be making a little belt for this dress too - but I've had enough for today.

Enjoy the rest of your Bank Holiday weekend everyone in the UK!

Friday, 22 April 2011

Butterick B4443 - Part 3 and look Mum, my 5 mins of fame.....

Also entitled, is interfacing and interlining the bodice a tad too much?

Yesterday the dress came together.  If you had the luxury of sewing for one full day you could make this dress as it's so simple.  Sadly I don't so I have the lining to complete and the corselette to attach:

This is the interfaced and interlined bodice section, attached to the skirt.  Remember to trim all excess seam allowances anywhere a seam crosses to reduce bulk (yet to trim the seams in this picture)

 I wanted to show you how to ensure your zip doesn't move when inserting it.  It's one of those simple techniques, but makes a huge difference to the back seam by keeping the horizontal seams in one line! (and an excuse to show off my newly manicured nails....)
 See, by crossing the pins, the zip has no way of shifting as you stitch.  Oh, I forgot to mention I decided to go with a concealed zip because I don't want any more bulk in the back area (remember there will also be the corselette closure too)
Lastly, for this stage, I try the dress on inside out and pin the front to the back down both side seams.  As you can see, there was a little bit of tweaking on the bodice, but I expected this.

And Finally....

My edition of Sew Today arrived yesterday morning so  I made a nice cup of tea and settled down to read it in peace. 

 I nearly spilt my tea when I saw this on the second page....

It's me!!!  I'm deep in conversation with Sara Radford who makes boned bodices and corsets.  She was displaying a tutu, which I'm sure Sara won't mind me saying wasn't really a tutu.  It was her first attempt so to save costs she used dress net and gathered every layer.  If you look carefully the bodice is a pretty underbust corset - not something a ballerina could wear on stage, ha,ha! We were at Sewing For Pleasure at the NEC end of March (where I bought this dress fabric).  I don't remember having my picture taken at all.  Queue quietly for autographs please.......

And just because, here is a picture of Alison Smith - a lovely, lovely lady who runs and owns Fabulous Fabrics and Alison Victoria School of Sewing.  I have taken a few of Alison's courses and always enjoy every moment I spend with her.  Look at that beautiful red corset!


I hope you are having a good day.  It's Good Friday, so fish on the BBQ this evening...

Thursday, 21 April 2011

Butterick B4443 Part 2 - inner construction

The powernet corselette is as complete as it can be at this stage.  I'm cross with myself because in my haste I realised I didn't have the poly boning that I wanted to use so have resorted to Rigeline.  It will be fine, just not my preferred type of boning.

Here's the stages following the pinning of the strips

 Press all seams open using your ham for the bust area
Fold the piece in half, wrong sides together and press the bottom edge

Prepare your Rigeline (if using this "lovely" product)  Some people balk at the sight of a flame in the sewing room, but I find this technique works well for me.  Once you have cut your pieces, round off the edges and hold close to the candle flame.  DO NOT put the Rigeline into the flame or else you'll end up with a gooey mess.  The heat will melt the edges and ensures it doesn't unravel, or those horrible spikes don't break through and get you!


Sew the Rigeline down using large a zigzag stitch ensuring you leave a gap of 2cm at the top and approx 1.5cm at the bottom.  Here you can see the wrong side which will be placed against the dress, and the right side which will be closest to the body.

Remember to use a ballpoint or stretch needle when you sew your powernet pieces together.  I also used mine to stitch down the Rigeline so that needle is now in the bin, it won't be any good for a new project.

That's it.  I won't be doing any more to this section until the dress is almost complete.  You can give the corselette its own closure and I prefer to use lingerie hook and eye tape but you can use a light weight open ended bodice zip (good luck with finding one, they aren't easy to get hold of), or you can attach the corselette closure directly to the dress and dress zip - Clear as mud?  I'll show you when I get there.

Enjoy your day, it's another lovely one here, the birds woke me up at 5 this morning.  I'm not complaining, more sewing time!

Tuesday, 19 April 2011

Butterick B4443 - a work in progress


This is a lovely pattern for summer dresses and doesn't call for much fabric.  I'm making view A and am using one of my NEC purchases from Fabulous Fabrics - I have just 1.4 meters.

When I read the instructions (a good habit I don't want to break no matter how simple the garment I am making!) I was so suprised....  This strapless dress has no inner structure or boning- can you believe it?!  Ok if you're young and have small bossoms under your chin and don't need any support, but not for a 40-something E cupped lady; Oh, perhaps that tells me something about who the pattern is designed for.

Anyway, I plowed on.  The instructions went back in the envelope and the dress will be made my way.  Whenever I make strapless dresses I always make up the front and back, but NEVER stitch the two together until the side seams have been pin-fitted which works very well for me, and I make a powernet corselette for inner structure (Unless it's a special occassion and then I might make a proper corset within the dress).

I'll show you my progress as the days go on, but here's where I am right now:

Skirt looks as though it's hanging strangely, but it is
 okay - I think it's just the heavy calico

Toile cut as a size 12 top, grading to a 14 at the waist and the skirt section is cut as a 14.  I added 1" seam allowances at the back because I'm not sure if  I will be using an invisible zip or a lapped zip - better to have too much fabric and trim it off than the other way around and also at the side seams - another habit I just can't break...


I kept my bra on as I will still wear a strapless bra with the finished dress.  Look mum, bust point is in the right place!


You can clearly see where the front has been sewn together and
how I've pinned the side seams.

 Pin the dress together down one side and to the zip point on the other - you need to be able to get into it!  Pinning yourself in isn't the easiest of tasks but with patience and practice it works out okay.  My zip will be down the back but I never put them into my toiles so the back is just stitched up.

Okay, so with a few tweeks I know it's going to fit just fine and I'm happy with the length too.  Now onto the inner structure.  I'm using flesh coloured powernet.  Ideally I'd like to use white but I didn't have any in my stash and as ever, I'm too impatient to wait for a delivery!

My personal corselette pattern.  This is the right hand side. 
Note the bottom edge of the pattern is on the fold.
Once you have cut out your pieces, you  have long thin shapes:


I've just pinned the right side together so you can see how it will look once stitched and folded:


I'm sure you've grasped the idea.  I will use a lingerie hook and eye closure and it will be boned with nylon boning (not horrid Rigeline) I won't use spirals in this instance.  As it's a summer dress it will need to go in the washing machine and I don't want to remove and re-stitch metal bones.

Just one last thing I will be interfacing the top section as my fabric has a slight crosswise stretch and I will be  interlining the top with white cotton too - just to ensure no one can see through it and to ensure the flesh powernet doesn't change the top section colouring.  The skirt will be lined with white bremsilk.


On a parting shot, I've been sewing "bits" over the last week.  Here's a jumper that went all bobbly after a couple of wears (SO annoying).  I felted it in the washing machine and made it into a cushion!


I hope the weather is as good for you as it has been for us here in Wiltshire.  We are experienceing unusually warm weather, lets pray this isn't our summer - remember the months of rain last year?

Enjoy the rest of your week