Friday, 29 April 2011

London Yesterday, Home and a Wedding Today

Sorry for the delay since my last post, it's been all go here after Easter and I haven't quite finished my dress - normal service will be resumed next week!

As if you didn't know, today was an important day for us here in the UK and yesterday my sister and I were lucky enough to be in London for a full day.  A day we planned back in September last year, before the announcement was made, and one we wanted to keep.

We decided to hit Regent Street and Liberty in particular.  Wow, did Regent Street look great! 

Regent Street, flags, buses and taxis!


Liberty of London


Liberty window display

The window displays were not only good, but very clever.  7 For All Mankind had a wedding dress and tails displayed all made from white and black jeans, but you didn't  realise it until you took a very close look.  Liberty had the back end of an old mini filled with wedding presents, Gola had a Union Jack made out of red, white and blue trainers and there were so many others....

The main purpose of our trip was to see the new musical, The Wizard of Oz.  It was BRILLIANT and I thoroughly recommend it to everyone.  A tad scary in places for children, but that's what theatre is all about - imagination!

We went to the evening performance so didn't arrive home until 1.15 this morning, so today was just about watching the Royal Wedding, eating some of our newly purchased hand-made chocolates and talking about very important wedding related girly things (my sister married two years ago).  The boys organised a bbq and we've had a lovely couple of days.


Here's a few photo's from the Wedding which I particularly like:  I've avoided discussion re the dress - everyone else is doing that!

Hello!

Oh dear Mr Beckham - shouldn't that OBE be worn on the left?
You look very, very nice Mrs B, but those shoes - ouch!

A few moments alone on the 300yard drive to Clarence House

We Brits do major events so well - here's the Mall before the crowds
were allowed down.
And here are some interesting facts:

The bride's earrings were a wedding day gift from her parents, Carole and Michael Middleton.  The earrings were the bride's "something new". For her "something blue", a blue ribbon was sewn into the interior of her dress, while her "something old" was the traditional Carrickmacross craftsmanship used to create the bridal gown.
Made by Cartier in 1936, the tiara was purchased by the Queen's father, the Duke of York (later King George VI) for his Duchess (later Queen Elizabeth and the Queen Mother) three weeks before he succeeded his brother as King. The tiara was presented to Princess Elizabeth (now the Queen) by her mother on her 18th birthday.
The bride's bouquet was a shield-shaped wired bouquet of myrtle, lily-of-the-valley, sweet William and hyacinth. It was designed by Shane Connolly.
Maid of Honour Philippa Middleton's dress was also designed and created by Sarah Burton at Alexander McQueen. A heavy, ivory satin-based crepe, it had a a cowl front with the same button detail and lace trims as the bride's dress.
The four young bridesmaids' dresses were designed by childrenswear designer Nicki Macfarlane and hand-made by Ms Macfarlane and her daughter Charlotte Macfarlane at their homes in Wiltshire and Kent -

these dresses were a nod to Diana as her bridesmaids wore very similar dresses

The mother-of-the bride Carole Middleton wore a sky blue silk dress with short pleated sleeves and pleated pockets by Catherine Walker - a favourite designer of Princess Diana.  Over that Mrs Middleton had a sky-blue wool crepe coatdress. Her hat was by Berkshire-based Jane Corbett. (ERM, NO, she is based in Wiltshire!)
The groom's stepmother, the Duchess of Cornwall, wore a champagne silk dress with matching duck egg blue and champagne hand-embroidered coat, both by the designer Anna Valentine.

Stunning. 
The two young women look elegant, posed, polished not to mention beautiful!

Oh and, of course, I couldn't go into Liberty without making a fabric purchase - more later!

Friday, 22 April 2011

Butterick B4443 - Part 3 and look Mum, my 5 mins of fame.....

Also entitled, is interfacing and interlining the bodice a tad too much?

Yesterday the dress came together.  If you had the luxury of sewing for one full day you could make this dress as it's so simple.  Sadly I don't so I have the lining to complete and the corselette to attach:

This is the interfaced and interlined bodice section, attached to the skirt.  Remember to trim all excess seam allowances anywhere a seam crosses to reduce bulk (yet to trim the seams in this picture)

 I wanted to show you how to ensure your zip doesn't move when inserting it.  It's one of those simple techniques, but makes a huge difference to the back seam by keeping the horizontal seams in one line! (and an excuse to show off my newly manicured nails....)
 See, by crossing the pins, the zip has no way of shifting as you stitch.  Oh, I forgot to mention I decided to go with a concealed zip because I don't want any more bulk in the back area (remember there will also be the corselette closure too)
Lastly, for this stage, I try the dress on inside out and pin the front to the back down both side seams.  As you can see, there was a little bit of tweaking on the bodice, but I expected this.

And Finally....

My edition of Sew Today arrived yesterday morning so  I made a nice cup of tea and settled down to read it in peace. 

 I nearly spilt my tea when I saw this on the second page....

It's me!!!  I'm deep in conversation with Sara Radford who makes boned bodices and corsets.  She was displaying a tutu, which I'm sure Sara won't mind me saying wasn't really a tutu.  It was her first attempt so to save costs she used dress net and gathered every layer.  If you look carefully the bodice is a pretty underbust corset - not something a ballerina could wear on stage, ha,ha! We were at Sewing For Pleasure at the NEC end of March (where I bought this dress fabric).  I don't remember having my picture taken at all.  Queue quietly for autographs please.......

And just because, here is a picture of Alison Smith - a lovely, lovely lady who runs and owns Fabulous Fabrics and Alison Victoria School of Sewing.  I have taken a few of Alison's courses and always enjoy every moment I spend with her.  Look at that beautiful red corset!


I hope you are having a good day.  It's Good Friday, so fish on the BBQ this evening...

Thursday, 21 April 2011

Butterick B4443 Part 2 - inner construction

The powernet corselette is as complete as it can be at this stage.  I'm cross with myself because in my haste I realised I didn't have the poly boning that I wanted to use so have resorted to Rigeline.  It will be fine, just not my preferred type of boning.

Here's the stages following the pinning of the strips

 Press all seams open using your ham for the bust area
Fold the piece in half, wrong sides together and press the bottom edge

Prepare your Rigeline (if using this "lovely" product)  Some people balk at the sight of a flame in the sewing room, but I find this technique works well for me.  Once you have cut your pieces, round off the edges and hold close to the candle flame.  DO NOT put the Rigeline into the flame or else you'll end up with a gooey mess.  The heat will melt the edges and ensures it doesn't unravel, or those horrible spikes don't break through and get you!


Sew the Rigeline down using large a zigzag stitch ensuring you leave a gap of 2cm at the top and approx 1.5cm at the bottom.  Here you can see the wrong side which will be placed against the dress, and the right side which will be closest to the body.

Remember to use a ballpoint or stretch needle when you sew your powernet pieces together.  I also used mine to stitch down the Rigeline so that needle is now in the bin, it won't be any good for a new project.

That's it.  I won't be doing any more to this section until the dress is almost complete.  You can give the corselette its own closure and I prefer to use lingerie hook and eye tape but you can use a light weight open ended bodice zip (good luck with finding one, they aren't easy to get hold of), or you can attach the corselette closure directly to the dress and dress zip - Clear as mud?  I'll show you when I get there.

Enjoy your day, it's another lovely one here, the birds woke me up at 5 this morning.  I'm not complaining, more sewing time!

Tuesday, 19 April 2011

Butterick B4443 - a work in progress


This is a lovely pattern for summer dresses and doesn't call for much fabric.  I'm making view A and am using one of my NEC purchases from Fabulous Fabrics - I have just 1.4 meters.

When I read the instructions (a good habit I don't want to break no matter how simple the garment I am making!) I was so suprised....  This strapless dress has no inner structure or boning- can you believe it?!  Ok if you're young and have small bossoms under your chin and don't need any support, but not for a 40-something E cupped lady; Oh, perhaps that tells me something about who the pattern is designed for.

Anyway, I plowed on.  The instructions went back in the envelope and the dress will be made my way.  Whenever I make strapless dresses I always make up the front and back, but NEVER stitch the two together until the side seams have been pin-fitted which works very well for me, and I make a powernet corselette for inner structure (Unless it's a special occassion and then I might make a proper corset within the dress).

I'll show you my progress as the days go on, but here's where I am right now:

Skirt looks as though it's hanging strangely, but it is
 okay - I think it's just the heavy calico

Toile cut as a size 12 top, grading to a 14 at the waist and the skirt section is cut as a 14.  I added 1" seam allowances at the back because I'm not sure if  I will be using an invisible zip or a lapped zip - better to have too much fabric and trim it off than the other way around and also at the side seams - another habit I just can't break...


I kept my bra on as I will still wear a strapless bra with the finished dress.  Look mum, bust point is in the right place!


You can clearly see where the front has been sewn together and
how I've pinned the side seams.

 Pin the dress together down one side and to the zip point on the other - you need to be able to get into it!  Pinning yourself in isn't the easiest of tasks but with patience and practice it works out okay.  My zip will be down the back but I never put them into my toiles so the back is just stitched up.

Okay, so with a few tweeks I know it's going to fit just fine and I'm happy with the length too.  Now onto the inner structure.  I'm using flesh coloured powernet.  Ideally I'd like to use white but I didn't have any in my stash and as ever, I'm too impatient to wait for a delivery!

My personal corselette pattern.  This is the right hand side. 
Note the bottom edge of the pattern is on the fold.
Once you have cut out your pieces, you  have long thin shapes:


I've just pinned the right side together so you can see how it will look once stitched and folded:


I'm sure you've grasped the idea.  I will use a lingerie hook and eye closure and it will be boned with nylon boning (not horrid Rigeline) I won't use spirals in this instance.  As it's a summer dress it will need to go in the washing machine and I don't want to remove and re-stitch metal bones.

Just one last thing I will be interfacing the top section as my fabric has a slight crosswise stretch and I will be  interlining the top with white cotton too - just to ensure no one can see through it and to ensure the flesh powernet doesn't change the top section colouring.  The skirt will be lined with white bremsilk.


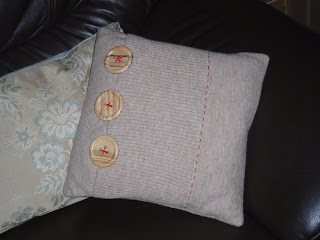
On a parting shot, I've been sewing "bits" over the last week.  Here's a jumper that went all bobbly after a couple of wears (SO annoying).  I felted it in the washing machine and made it into a cushion!


I hope the weather is as good for you as it has been for us here in Wiltshire.  We are experienceing unusually warm weather, lets pray this isn't our summer - remember the months of rain last year?

Enjoy the rest of your week

Monday, 11 April 2011

Vogue 1170 - A Keeper!

Well, I just don't know what made me buy this pattern because when I pulled it out of the pattern stash yesterday I thought "Oh dear, another one that will never get used".  That skirt is WAY too short and the blouse is a bit "odd" to my eye, and being blessed in the chest dept means all that fabric in the knot/twist area will draw even more attention to that area!

But, I did like the shape of the skirt which I had a feeling would be geat for my pear-shape.  SO  I set about with extra tissue paper and lengthened it by 17cms (very precice!) and re-drafted the hem facing.  Having checked the finished measurements I decided to cut a 16 and work on a toile.  I had some purple poly crepe which I knew would drape beautifully, but was never very sure what inspired me to purchase purple in the first place....

Want to see the results?  Here they are, but be warned, the skirt is on Vivienne who's a size 10 so it's pinned at the waist and hangs a little oddly, it doesn't look like that on me.  Oh, and in my excititement to share a skirt pattern that fits, I haven't hemmed it or finished the waistband yet ( I usually do for a toile, honestly!)....


Vogue 1170   Tracey Reese
Or "That skirt is so short, one gust of wind and you'll see her knickers"

Front skirt with square set yoke front seams

Side view - look at that lovely drape

Back view - the yoke falls just in the right place on my body
and is extremely flattering for a pear-shape


I always use 1" seam allowance at the back so I have a little more fabric
to work with when inserting the zip.  I won't add the extra next time because, as
you can see, I ended up taking in approx 2" on the back seam


Conclusion?   This pattern is a keeper!  I am head over heels with it, Spring, Summer, Autumn, Winter I will definitley be making this one again, probably alot...  Crepe backed satins, wool crepe, linen, lawn, denim....
Now, I need to fit it into my Spring / Summer wardrobe planned colours (yes, I have a plan!)

Future alterations - trim pattern piece to 15cms as 17cms is just a tad too long and re-draft the hem facing (again)  Don't worry about the additional 1" seam allowance for the zip, and a small sway back tuck.

Did I mention I love this pattern?!  What a great way to start the week, hope you have a good start to yours.

Friday, 8 April 2011

Which way up?!

Here's what I made this morning - it took me around 3 hours.  I enjoyed making it but boy, simanay is hard on the hands - much tougher than tutu net!


From this....

To this...

To this!
 But which way up does it go?!

This way....

Or this way?!  (Sorry it's a no makeup day today)

Downward I think
I bought this kit at the NEC and added the black rhinestones and button just to "finish" it.  I think it will work well with the Linton Tweed and the fabric green print from Gorgeous Fabrics (when it finally gets here - I'm still waiting).

Fascinators aren't tricky to make and the materials aren't expensive - there are loads of suppliers on ebay.

Okay, so that's me done for today.  We have a beautiful sunny day so I'm going to sit int he garden witha cup of tea and plan what's next on the sewing hit list.  Enjoy the rest of your day!

Tuesday, 5 April 2011

Red Meat in the Fridge - Ian's on his way home! And here's what I've been sewing behind the scenes...

Ian and Jack are on their way home from Ireland.  The fridge is filled with red meat, pies, full fat milk and a token bag of salad for me....


I've missed our little rascal!

And the big rascal...

Erm, yes darling, I have missed you but it has been lovely watching what I want on the tv, eating what I want, sewing at the drop of a hat (6am anyone?!) and the house has stayed tidy!  Sometimes it's good to have a break from each other isn't it?  We lived in our own homes as singletons for years so sometimes we just get on top of each other - his flying "stuff" gets on my nerves, and I know my very important sewing room drives him bonkers when I'm in creative mode (no, it's not a mess - ever).


Here's what I have been working on during March.  It's about to go to my customer so I can share it with you now.

It's the first tutu I have made and I'm happy with it.  It is simply decorated because she is such a tiny little thing so we didn't want her to be overpowered by it.  The most costly aspect of a tutu is time - hand pleating and sewing on sequins - two of my favorite things!

Balanced on the ironing board and stuffed with a feather
pillow - it helps with the steaming

Sorry, the bodice looks a little wonky on this picture....

The leg casings and the straps will be tried and finished on the dancer when we meet, and it needs a good steam so the tutu isn't so "bongy" (that's a technical term I made up!)

If you like tutu's take a look at Tutu.com the work there is amazing.

Happy Tuesday all

Monday, 4 April 2011

Vogue 1099 - Casual Chic

A casually chic jacket to go with jeans, or shift dress.

I've had this pattern for just over a year, and bought the fabric last summer (Cloth of Gold, Wootton Bassett).  I used 100% cream linen and a poly cream lining along with a poly organza.  I wanted to use a silk organza really but it's not that easy to find locally and I didn't want to buy on line as the pattern only calls for a small measurement.


I haven't tackled the trousers as yet.  I think they may suit me but not with this jacket because I'll look square and "dumpy".  They would look better with the white linen jacket as that has a slimmer shape.

Anyhoo, here's the results:


I shortened the body of the pattern by about 1" because the hem fell at my widest point, I couldn't really shorten it any further.


I really, really like the bias collar with the organza ruffle.  Sadly with the amount of pressing that has to be done I did catch the ruffle with the iron so it is a little flatter than I would prefer.


The sleeves are lovely.  There are 5 rows of gathers, a top sleeve that hangs over and they are quite full.  I also particularly like the way the sleeves are set in, but it was important to transfer all the pattern markings otherwise they could be a pain.

Surprisingly I cut a 10!  Having read the finished measurements I was sure the 12 would have been too big.  I didn't make a toile, but I did tissue fit - carefully!  I'm not sure I would make it again, just because it is so distinctive.

So, what's next on the list?  The fabric from Gorgeous Fabrics hasn't arrived as yet, so it won't be the green print skirt.  I may make the brown linen I bought at the show into a shift dress, or a pencil skirt and fitted top (a bit boring, but no doubt I can jazz it up with some trim!) If I make up the brown linen this jacket will go with it nicely, so that will be one more outfit for my depleted wardrobe.....