Showing posts with label corset. Show all posts

Tuesday, 8 March 2011

Anyone interested in a corset sew a-long?

I've been thinking about this for sometime and know a few ladies are keen to try it for themselves.  I'm an experienced corset maker and am sure I can help some of you who are itching to give it a go!

I was thinking of starting Sunday 27th March which is officially the start of British Summer Time.  If you are anything like me, this is the time of year where I start to get a little more creative and shake off those winter blues!

Let me know your thoughts in the comments below and if there are a few of us, it'll be a go'er!


PS I have no idea how to create one of those lovely buttons to attach to your blogs....

Happy Tuesday all xx

Wednesday, 12 January 2011

Grey Pinstripe Skirt and Waspie - Done!

In traditional Pin Queen style, I have NO photo of me actually wearing the garments - I'm still nagging waiting for Ian to take the pictures (it's only a case of pressing a button darling!).

In the meantime here's a couple of views of work in progress:

It looks like a normal side seam...


But there's a surprise!

I used a slotted seam to achieve this look.  The technique is very simple and gives a lovely result (think crepe trousers with satin trim etc...)  Set your sewing machine to a longer stitch length - I used 3.5 on my Janome.  Once the side seam is sewn, meld stitches.  Take a seam ripper and cut every 5th stitch, then press your seam open as usual.  Next, you need to lay your trim over the seam allowances as follows:


Oh look, my nails match!
If you have a walking foot, it's a good idea to use it as the next step is to stitch the trim to just the seam allowances, work from the top down on both sides in case there is any movement - I had a small amount. You can decide how far apart you want the stitches to be, mine were around 1.5cm as I want the trim to be really visible when I walk.

Oops, my trim moved as I sewed it, but at least it's on the inside!
Press the seam/trim and now the fun bit - remove the original seam stitches - the ripping of every 5th stitch makes this process a little easier.

I love putting in concealed zips:


Here's a quick view of the inside - a lovely bright green!


Here are a couple of pictures of the waspie in progress.  I used a soft coutil for the backing as it's one of my favorite fabrics.  I use it all the time for my corsets too.


As you can see, I sewed the side seams wrong sides together so I could put my casings on the outside.  As I don't want this to be tight fitting I used plastic whalebone rather than spirals for support.


I cut my casings so the stripes were horizontal, just so they stood out and I've stitched them down with green thread.  The closing is an open-ended zip (I didn't want to use a busk) and I've trimmed it with the green lace used on the skirt lining.

I'm delighted with the results!  Photo's to follow.  Perhaps I should just have an end of month fashion show?!

Now I'm working on this - and it's nearly finished!


Have a good week!

Tuesday, 4 January 2011

Knitted Top, Straight Skirt and Waspie

The knit top was a success!  Aren't they easy to do?  I didn't bother setting up the overlocker because I was convinced I'd never actually finish it!  I used a small stretch zigzag for seams and twin needle to hem which worked perfectly well, but would definately use the overlocker next time.  I have no photographer today, so photos to follow (probably at the weekend).

I'm sewing from the stash this month.....  Next on my to do list is a straight skirt and waspie; I'll be using the fabrics below, plus notations from the stash.  The wool is dark grey with a chalk stripe, the lining and lace are an acid green colour (didn't photgraph too well late last night) and the grosgrain ribbon ties the project together.  I'll be using a technique I haven't used for a while (Slotted Seams) and am looking forward to making this one! I'll post on the technique later tomorrow.


The skirt is a self-drafted pattern, as is the waspie.  You've seen the waspie here
 
before, but the pinstripe one won't be so elaborate.

Have a good day!


Friday, 29 October 2010

Party Time!

As mentioned earlier I want need 2 party dresses this year so decided on one dress and one skirt/top combo.

I'm going to make a strapless top with corset insert using the top left pattern and a circle skirt using the vintage vogue pattern, although you don't really need a pattern to make a circle skirt.  I've decided on black (yawn) for this outfit.  Black satin top, trimmed with grosgrain ribbon and buckle/bling embelished and satin skirt using this:
- it is black, honestly!  A full petticoat with black dress net and tulle will give it a little oomph I think.

I'm liking the Simplicity dress with overlay and have teal in mind, but not sure what/how as I haven't seen any yet. I'm having a shopping trip tomorrow so will see what's available.

I've made a start on the corset section of the top and will post some pictures and techniques as I go.  In the meantime here's a list of the fabric and tools you will need to make the strapless top.

1  Your favorite strapless top pattern adjusted to fit
2  Outer fabric, lining, soft sew-in interfacing, coutil - please use coutil it really is the best fabric for corsets
3  All purpose thread, open-ended zip (typically 30cm)
3  4mm eyelets
4  5/7mm plastic boning (not that horrible rigeline please!)  sometimes called whalebone, although it is of course plastic these days!
5  4# 7mm flat flexi steels approx 15cm each, but make up your pattern first and measure the length you need
6  2.5cm wide organza ribbon - approx 3m
7  Bias binder maker, eyelet plyers if you have them
8  Tracing paper, ruler, coloured pencils, cellotape 
9  Usual sewing paraphernalia!
10 - oh, piping cord if you want to finish the top and/or bottom edges plus extra fabric for the covering

Betty Update:
Betty Bernina arrived safe and well, but she was very naughty today and tripped the electics to the whole house - twice.  She's going for a health check tomorrow before any serious damage is done!

That's all for now, I'll post on the technique over the weekend - have a good one!


Wednesday, 6 October 2010

Underbust Corset - Done!

Here's a picture of my latest creation; an underbust corset made with a pretty strawberry print cotton outer and black coutil inner.  I used 2 row eyelete tape for the front closure rather than a busk and german boning instead of steel spirals - that way it will be washable.  The front looks a little out at the bottom, but it's not, just an odd angle on Vivienne I think.  Oh, and yes it matches the bra I made last month.  I've also got a 1950's gridle to match that I made last year.  I   L O V E  this particular print - if you hadn't guessed?!
Here's a peek inside at the casings:

Monday, 4 October 2010

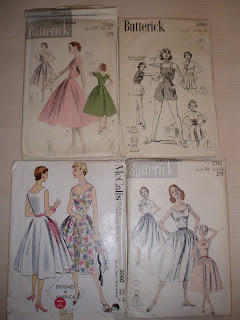
Look what I found!

With the move from Yorkshire to Wiltshire last year I had completely forgotten about these patterns and found them in the loft yesterday evening whilst organising the stash (yes, it's in the loft, we have no storage space in our house!).


Mum gave me them about 18 months ago.  One of her friends wife passed away in the late 80's and the family were still sorting through her belongings and he very kindly told Mum she could take whatever she liked from the sewing room.  Naturally Mum didn't want to raid the place so she took some patterns that she thought I might like and guessed the sizing (spot on Mum!) along with some lovely old thread and a small quantity of brocade.  I understand there was a huge stash of beautiful wool, tweed and silk and a tonne more patterns. It made me sad to think what the family may have done with it all, but am really pleased with the things Mum picked for me.
It makes me wonder what will happen to all my patterns, notations and stash when I go - hopefully I'll have worked through most of it by then!

On a lighter note, here are a couple of pictures of the waspie.  These photo's don't do the fabric nor colour any favours, but you get the general gist....


I just need to finish the ruffle centre with a row of sequins to match the top trim - but I haven't got those to hand so will have to purchase later this week.  I've fallen back in love with my ruffler - it was well behaved yesterday!

Not sure what the next project will be - I really should make another corset as I haven't done one for a while - what do you think?